The Electra Forums

Guitar Talk about Electra and other vintage imported guitars
Home
Index of Models
The Electra Forums
PM Inbox
It is currently Sun Nov 24, 2024 7:14 am

All times are UTC - 8 hours


Post new topic Reply to topic  [ 9 posts ] 
Author Message
PostPosted: Fri Jul 22, 2016 12:13 am 
Offline

Joined: Sat Jun 04, 2016 11:32 pm
Posts: 55
Location: San Rafael, CA
I've been thinking about refinishing a solid body guitar with two part polyurethane paint. I am a boatwright, and also hand and spray paint and prep boats, both wood and fiberglass.
In fact, I am considering using the marine paints I am familiar with, as I see no reason why they wouldn't work well on a guitar. For one thing, marine paints are designed to be less effected by temperature and humidity changes

I think anyone considering polyurethane guitar refinishing, might find helpful what I have learned from painting boats. And I'm sure some here are already experienced, perhaps from auto body painting.

On these and other guitar forums I see comments about polyester verses polyurethane finish paints. They are not necessarily two different things. If it was all polyester, it would be a resin, like used in fiberglass or gell coating fiberglass, not a paint. The paint I use on boats is a polyester based polyurethane.

Here's the product description of AwlGrip marine paint for boats.
"Two component, polyester based, light fast, linear aliphatic polyurethane."

They also make an acrylic based polyurethane called AwlCraft

The AwlGrip is harder and more solvent resistant.
The AlwCraft is a little more repairable and easier to blend the gloss with buffing, to repair a scuff or where a minor repair was done.

Awlgrip is the number one brand of two part polyurethane paint for boats. It sprays on in thin coats, and a two part epoxy primer is used under it. Dried film thickness for two full wet coats is about 2 mills. Two or three coats is what is usually applied. There are high or medium build epoxy primers, and Awlgrip has a thin finishing epoxy primer that is preferred under the topcoat. The finish primer is called 545. Sometimes it's all that's needed. And you can spray multiple coats the same day if you want. We sand to 320 grit before top coating.
There is a large selection of colors for AwlGrip and I think they will make custom colors.


AwlGrip cures really shiny, kind of a wet look shine, that is usually very hard to reproduce by sanding or buffing. I think the molecules being so tightly bonded to each other is what makes the shine so good. That creates a surface tension that pulls the surface smooth. The only thing they recommend buffing it with is 3M Finesse It #2 - or 3M Perfect It.
These are very fine polishing compounds that can remove minor orange peel from spraying. Or to get a shine where there might have been a little dry spray on the last coat, perhaps from overspray on top of paint that is already kicked off.
The other times we sometimes buff is if a boat was painted maybe ten years ago and has lost some shine and color retention.

A really good medium build epoxy primer is Proline Y3060 series. It will cure in low temperatures, though it works just as well at higher temps. Sands nice. When I prep a boat for a polyurethane spray job, I fill and sand everything I can find on the bare surface. Then I prime with Proline 3060, which is when you really see where you are at. You have to have it all one color, usually white or gray, so you can see the little flaws that still need attention. Gassing off from primer can cause pinholes that need filling.

Epoxy fairing putties can be made by mixing various fillers in to the resin, depending on their purpose. I use a phenolic based lightweight filler that spreads and sands smooth easily. Then I resand the hull. Another way to fill pin holes is to use a plastic spreader to apply partly cured epoxy primer into the pinholes. (Really small holes are hard to fill)
Then spray more of the same medium build epoxy primer, or a finish primer like AwlGrip 545, which sprays thin and sands to perfection.

The trick for final primer sanding is to use guide coat. Auto body supply shops sell Black Guide Coat in an aerosol can. You hold it back from the surface a good distance and spray pocka dots all over the primed surface. It's often hard to see orange peel in sprayed primer. With guide coat you cant miss. If you see any specks of black guide coat on white primer, there is orange peel there, even if you don't see it. - or other defects.
It also keeps you from oversanding. When you see no dots you are done. And its as smooth as it will ever get at that grit level.
You can also use ordinary flat black primer in an aerosol can as the guide coat.

You need to be sanding only primer on the last time around. That way it all sands exactly the same. Epoxy primers sand beautifully. Stiff enough to hold up to the sanding, means they sand evenly. If you are sanding more than one material, one is harder and tends to get polished while the softer material gets dug out.

And you can use epoxy surfacing fillers over them. Re-prime any fillers before last sanding though. - a light coat, lightly sanded is best if you are spot priming. You want the same smoothness and the same porosity everywhere to get an even shine. We don't sand the finish coats. It's all about surface prep.

When I read or hear people describing painting guitars, it's about lots of very thin coats of color paint, which is sanded and then clear coated, which is sanded and polished.
While this is probably the best way for lacquer finishes, it's not how I would use polyurethane paint. Too labor intensive. It's much easier to sand primer.

Afer Good surface prep and primer on a boat, we spray two or three full wet coats of finish paint, done over about 3 hours ( 35 -45 minutes between coats) and you're about done. You could buff with something like 3M Finesse It. We don't buff it on boats, unless to fix a dull spot or slight blemish, maybe where a bug landed in the paint or a small run had to be sanded. The other times we buff is if a boat was painted maybe ten years ago and has lost a some shine and color retention.

I usually do a light ghost coat or tack coat, then two full wet coats. The tack coat helps adhesion and helps prevent runs and sagging in the next two coats, while helping get some color on. If you have a few dark spots that show through the sanded primer give those spots a ghost coat to help color coverage of the two wet coats. A third wet coat can be applied if desired or necessary.

By full wet coat, I don't mean thick. If you watch from more or less parallel with the surface as you spray, when it looks uniformaly shiny and wet where you spray, that's heavy enough. That's all it takes for a solid color shiny coat, without runs. Always test how the gun is spraying on some hard smooth surface beforehand. This is also good practice, to learn what I just described actually looks like. Also to get your spray fan size and shape dialed in.

The pot life is long enough for a couple of coats, (probably for three or more on a guitar) but I always clean the fluid and air nozzle and tip of the needle between coats, if I'm leaving the paint in the gun's canister. I take the air nozzle off and soak it in thinner and clean the fluid nozzle and needle with a tooth brush and thinner. The air nozzle has tiny air holes that you don't want paint to harden in.
Use lacquer thinner to clean gun.

A cheap touch up gun, even the $10 ones at Harbor Freight, will atomize paint better than most gravity feed HVLP guns.
And for a guitar you don't need much paint. I recently painted a 12 foot long 8 inch diameter aluminum boom for a sailboat with my touch up gun.

Any feedback, criticism or questions welcome.


Top
 Profile  
 
PostPosted: Fri Jul 22, 2016 9:34 am 
Offline
User avatar

Joined: Mon Oct 27, 2008 7:10 pm
Posts: 3051
Location: Tifton, Ga USA
Thanks for sharing your knowledge here on the forums as we all love to see our Electras reborn from the scrap piles. :up:

_________________
Always give thanks for everyday, It may be your last so Rock On Semper Fi!!


Top
 Profile  
 
PostPosted: Fri Jul 22, 2016 1:27 pm 
Offline
User avatar

Joined: Fri Jun 08, 2007 2:06 am
Posts: 1085
Location: Mount Hunter, New South Wales, Australia
Indeed! Thanks for taking the time for the how-to; it's just a shame that you cannot impart the hard won skills and feel that you've acquired along the way!!

I freely admit to doing everything on a restoration apart from the painting!! I'll use stain quite happily but painting with 2 pack is way out of my comfort zone and I know my limitations - i have an artist with the airbrush as a personal friend not too far away from me and I get him to do the artwork and finish coats; he charges me well under the market rate and the jobs are never less than absolutely superb, so money well spent.

Yep - I am a believer in 2-pack after having four guitars done by Hans where he's airbrushed on the artwork to my design cues with his input, and then blown on a 2-pack clear - of the type used for vehicles as that is his main work - which is then flatted back and built up to a deep, deep lustre by further applications of said clear; the results are astonishing and like I say, money well spent!!

_________________
"... and on the eighth day, God created New Zealanders.

Because even the Australians need heroes."


Top
 Profile  
 
PostPosted: Fri Jul 22, 2016 11:06 pm 
Offline

Joined: Sat Jun 04, 2016 11:32 pm
Posts: 55
Location: San Rafael, CA
Mortarman and Corsair, thanks for responding.
It's the least I can do since most of you have more to share about guitars than I do.

After posting the topic I realized that I don't know what kind of spray guns are typically used in guitar painting.
Airbrushes came to mind.
I know my touch up gun would do a good job. But even it holds more paint than necessary to paint a guitar.
The 12 foot boom I mentioned only took about 4-5 ounces of paint. I've never used an airbrush. Maybe I should give it a try.

When I paint boats I use a conventional Binks 2001 pressure pot gun. I don't do it that often, as I am mainly a woodworker. So, though I know how to spray well, it's still challenging to paint a 30 to 40 foot boat and not make any mistakes. A guitar would be much easier, as it would take seconds to spray, maybe a few minutes per coat.

It takes about 40-50 hours of prep and priming a boat and about 3-4 hours to spray paint it. that inlcudes the waiting time between coats

I was going to mention that cars are painted with acrylic urethanes. We hardly ever clear coat boats. The wet look shine gives plenty of depth without it. Sometimes it is done on dark colors, but not on white boats. Usually on neither.

On a guitar, I might find my procedure changes. Since it will be seen up close, slight orange peel that wouldn't be noticable on a boat, might mean buffing with one of the fine compounds from 3M that I mentioned. Maybe even clear coating.
I won't know till I paint one.


Last edited by Sailrick on Wed Aug 03, 2016 12:07 am, edited 1 time in total.

Top
 Profile  
 
PostPosted: Sat Jul 23, 2016 3:51 am 
Offline
User avatar

Joined: Fri Jun 08, 2007 2:06 am
Posts: 1085
Location: Mount Hunter, New South Wales, Australia
OK.... kit.

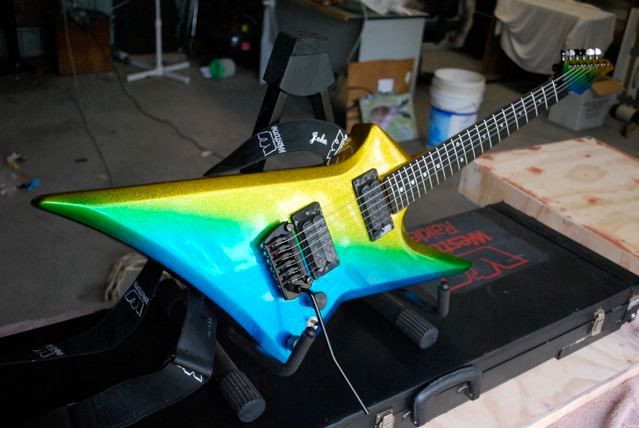
I know Hans uses a normal gun to blow on primers and basecoats, and possibly even the topcoats for the likes of the metal flake finish on the Raider II shown here...

Image

... and for the likes of the artwork on my two Avengers, he uses a selection of Paasche siphon feed airbrushes. Siphon feed because he can keep mixed colours in the wee bottles and not have to clean everything at paint change, just the brush itself, which is a doddle because he has a bottle of thinners ready to go for just that purpose!! He has no objection to gravity feed brushes, he just pefers the siphon.

The clear coats are done with a normal gun. You must realise, though, that he does my guitars as an addition to what he does commercially, i.e. if he has to prime a guitar, he'll wait till he has a few motorcycle tins to do in the booth, and the same for the clear coats. The only stuff done purely for my guitars is my colourway/artwork.

viewtopic.php?f=40&t=8344

The reason he clearcoats the guitars is for finish protection - that stuff really is hard as nails, eh, once it's cured and imparts fabulous protection for one-of-a-kind finishes!! I've opted for gloss clear simply because I like the depth of finish; you can use a semi-gloss or even a matte should you want.

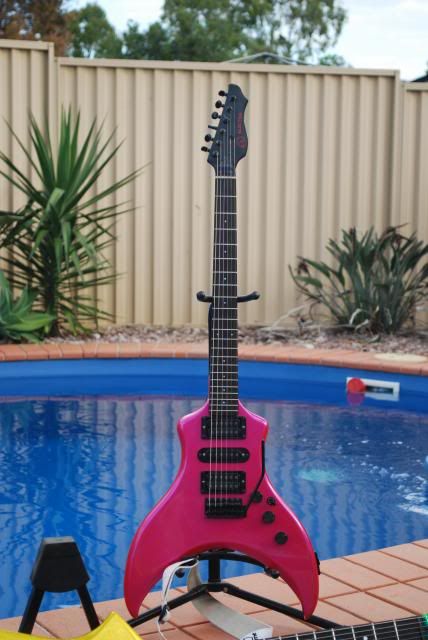
My Electra Lady is another of his; he matched the colour in the cavity - by eye!- and after I had filled and sanded the thing back to dead set flat, he blew the primer on with a gun, then the red basecoat, and the silver pearl over the top also with a gun. Clear coat as above.

Image

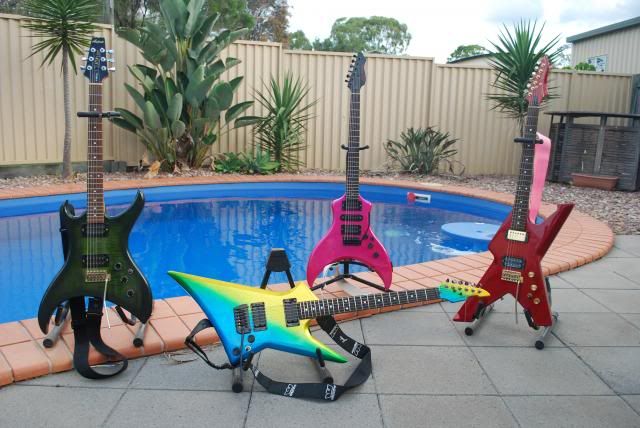
In this pic, Hans has had a hand in three of the four; only the Vantage Invader is original; the green Aria Pro Urchin is my work on the stained veneer, and Hans did a dark pearl green burst and a clear over the top.

Image

_________________
"... and on the eighth day, God created New Zealanders.

Because even the Australians need heroes."


Top
 Profile  
 
PostPosted: Sat Jul 23, 2016 12:03 pm 
Offline

Joined: Sat Jun 04, 2016 11:32 pm
Posts: 55
Location: San Rafael, CA
Thanks for the info on spray guns. The touch up guns are siphon feed. I also have a few gravity feed HVLP guns. I used those until someone who was retiring gave me the Binks pressure pot gun. It's a superb gun. The advantage of pressure pot is that you can hold the gun in any position and not worry about losing suction, as sometimes happens with siphon or gravity feed, when you tilt the gun, especially if the canister is low on paint. Or when you radically tilt the gun, paint clogs the air vent on top of the canister.
The disadvantage is that my Binnks gun needs about 12 CFM of air at 40 pounds, which means a 220 volt large tank compressor or a gasoline powered 8 hp or so compressor, with a big tank.

Nice work on those guitars. It had occurred to me that clear coat would help protect the color topcoats from scratches, scuffs etc. The other advantage, I think, is that any orange peel in the clear coat will not show as much as in color topcoat. That's assuming the color paint is sanded or buffed to take out any orange peel before clear coating. I suppose that's why they use it on cars.

As you probably have seen, a lot of cars have peeling clear coat. Not sure why that happens, or if it's a problem that has been solved on newer cars. On boats and cars you are dealing with the deteriorating effects of UV rays, being in sunlight all the time. That's why we don't ever clear coat white LPU paint. The clear might yellow from UV damage, while the color topcoat is good for 10 -15 years of gloss and color retention. LPU= linear polyurethane


Top
 Profile  
 
PostPosted: Sat Jul 23, 2016 9:33 pm 
Offline

Joined: Sat Jun 04, 2016 11:32 pm
Posts: 55
Location: San Rafael, CA
Regarding what I said about tilting a suction or gravity feed gun. Some guns have a pastic pouch that holds the paint, in the canister. This allows more freedom of movement.


Top
 Profile  
 
PostPosted: Sun Jul 24, 2016 9:39 pm 
Offline

Joined: Mon May 30, 2016 8:24 pm
Posts: 43
Location: Oak Ridge Tennessee
As far as the clear over the color that gets sanded and buffed pretty much on any guitar.No one wants any orange peel at all on their babies........lol


Top
 Profile  
 
PostPosted: Sun Jul 24, 2016 10:07 pm 
Offline

Joined: Sat Jun 04, 2016 11:32 pm
Posts: 55
Location: San Rafael, CA
Thanks vballr.


Top
 Profile  
 
Display posts from previous:  Sort by  
Post new topic Reply to topic  [ 9 posts ] 

All times are UTC - 8 hours


Who is online

Users browsing this forum: No registered users and 7 guests


You cannot post new topics in this forum
You cannot reply to topics in this forum
You cannot edit your posts in this forum
You cannot delete your posts in this forum

Search for:
Jump to:  
Powered by phpBB® Forum Software © phpBB Group