The Electra Forums

Guitar Talk about Electra and other vintage imported guitars
Home
Index of Models
The Electra Forums
PM Inbox
It is currently Fri Nov 22, 2024 4:15 am

All times are UTC - 8 hours


Post new topic Reply to topic  [ 16 posts ]  Go to page 1, 2  Next
Author Message
 Post subject: X310 restoration
PostPosted: Sun Oct 26, 2014 6:28 pm 
Offline
User avatar

Joined: Wed Nov 19, 2003 4:58 am
Posts: 984
Location: Southern Indiana
Picked up an X310 carcass with the basic MPC pots and sockets, everything else removed. I decided to restore it because I have *some* parts and just can't stand to see a guitar parted out and not restored. Now guess what I find? The 50K volume and tone pot strikes again! Wow, I haven't been doing as many of these as I used to, but I check every one right now, and it has been about 50% of these have had 50K pots lately. So DON'T FORGET TO CHECK if your MPC sounds like dull and like junk even if you replace the pickups - its the friggin 50K pots again.

I found a good modern replacement rotary switch. I have a brass nut coming in, and bridge and tailpiece. I had enough parts here in chrome to build it out, but I want it to be correct (and gold). Getting some of the parts in may take a while, so I have to be patient. So I will report more later as parts come in and I make progress.

_________________
Thorny


Top
 Profile  
 
 Post subject: Re: X310 restoration
PostPosted: Sun Nov 16, 2014 10:00 pm 
Offline
User avatar

Joined: Wed Nov 19, 2003 4:58 am
Posts: 984
Location: Southern Indiana
Well, it is pretty close to completed! I had to cut the back covers out for it (except I had the MPC door). This one started out as a carcass I got from Dr. Dave, with just the MPC sockets and 150K pots (had the 50Ks in it instead of the 500Ks - so put those in). I put in a new 5-way switch, new hardware, bridge, tail, pickups, grover keys, a correct brass nut. The bridge I got in had a non-standard thread in the bushings to I robbed bushings off another bridge (and had to cut them length-wise because of the shallow depth with the brass bushing). Man, making those back covers took a while and was messy. The new rotary switch was slightly different, so I had some manipulations to do with that to make it work well, but it all worked out. I have the nut close to being where i want it and the intonation has been set. I have a few tweaks to do, but it is pretty well there. The pickups are close to the original in output (with the bridge pickup being a bit hotter), and are new 4 conductor ones and fully potted. They really sound a little better than stock (unfortuately didn't have any stock ones as they were not in the guitar). I think but I need some time with it (too late to play more tonight). I bought the original MPC cover from ebay, and had an original knob and "poker chip" in my now dwindling parts stash. The pickup rings were from my stash as well.

I have not tested the MPC function yet, so that is next. This one was made in 1978 according to the date on the battery removal "ribbon." The sound acoustically is fairly loud and it rings well - good tone - and that makes a difference too. The only thing missing is one chipped layer off the multiply binding on the end of the headstock. It has numerous dings on it, but still looks pretty good. I put a lot of work in this one.

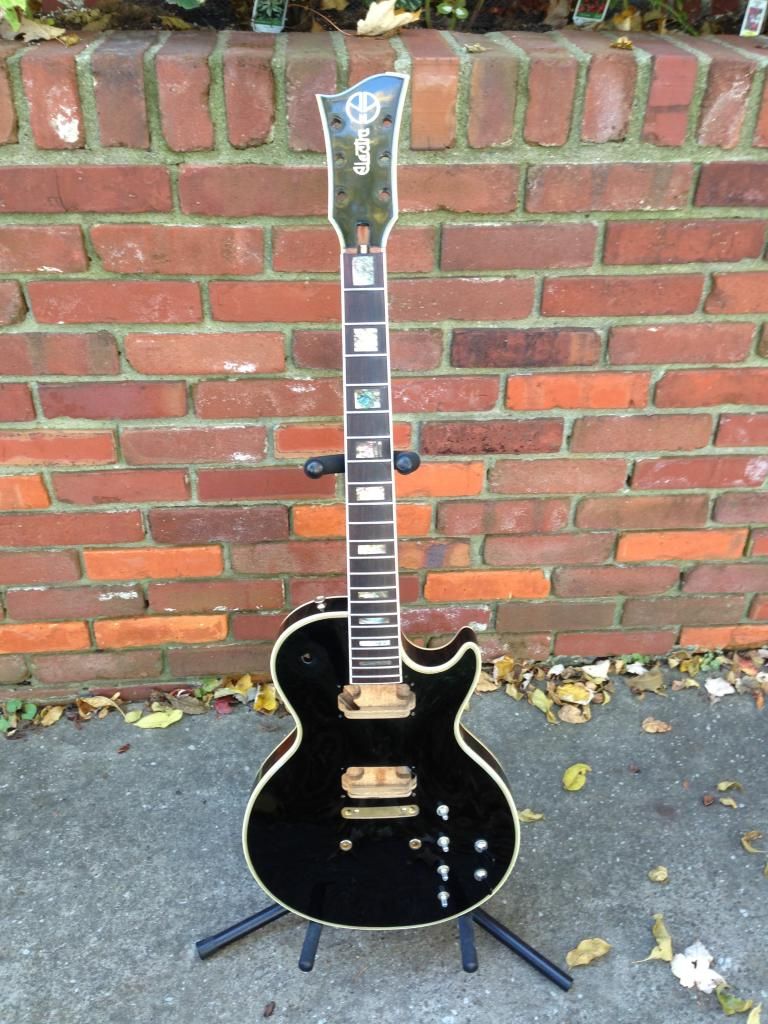
Before picture, got it in and cleaned up and polished the "carcass" a bit.
Image

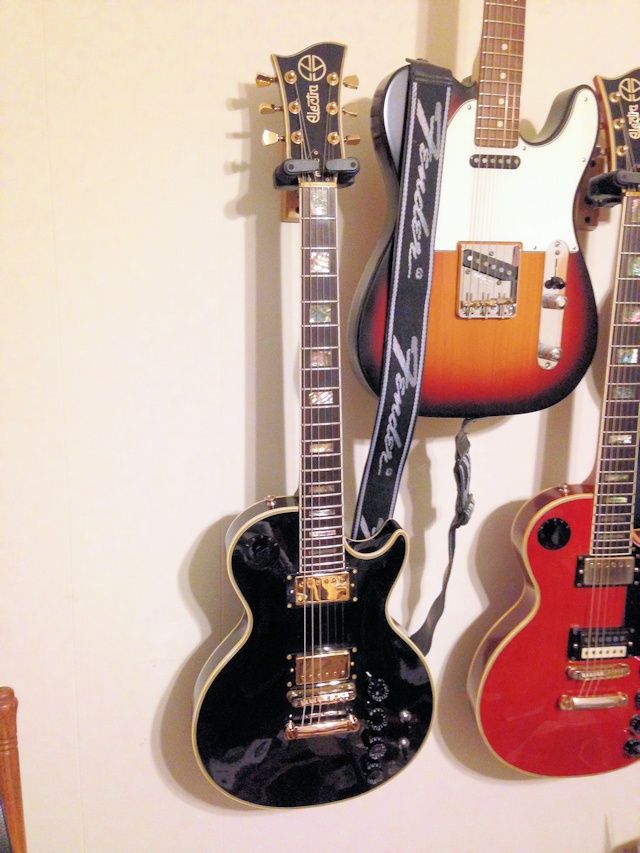
:look: check it out afterwards!
Image

_________________
Thorny


Top
 Profile  
 
 Post subject: Re: X310 restoration
PostPosted: Thu Nov 20, 2014 6:37 am 
Offline
User avatar

Joined: Fri Feb 11, 2011 1:19 pm
Posts: 714
Location: Harrisburg, Pennsylvania
:love: Well it certainly looks amazing! Let us know how everything works when you fully test it.

_________________
"GREAT Googiley moogilie Jack...jumpin jehosephat, hot dang and all".
- jdwhealton


Top
 Profile  
 
 Post subject: Re: X310 restoration
PostPosted: Thu Nov 20, 2014 8:46 am 
Offline
User avatar

Joined: Wed Nov 19, 2003 4:58 am
Posts: 984
Location: Southern Indiana
I tested it last night and everything works as it should! I had to clean up my module edge connectors, they were kind of nasty. I suppose the ones in the guitar are fine because it works well. I might replace the snap on 9V tab - a weak point in all of these. This one has already been replaced, but it has the wires coming out in the middle rather than the side so it is tight getting it in and out of the narrow 9V slot. I tweaked the intonation a bit better. But I probably need to file the nut down a little more as I like it to be easier to fret at the 1st fret - still it is about typical rather than high (most don't seem to get this right). I had a little tiny bit of weirdness too - one not would buzz, turned out to be a loose tuner nut on the headstock, and another turned out the a saddle was not fully seated properly - both easily fixed.

The 5 way switch is easier to flip than the stock - and that is kind of good. Wiring it was a bit different too because the common points was at the bottom rather than the top of the sequence, so had to figure that out. But I think I already talked about that. I had a wire pulled tight in the pickup cavity and had to remove the bridge pickup to pull a little bit of slack back so it would sit properly (not at an angle) - all easily done. So, only thing missing on this is a pickguard, and not sure I want one on it. The pickups sound pretty good. I haven't really cranked it and tried it super loudly or for any length of time, but everything works. I'd call these medium frets and they still have a good amount of life on them, the fretboard isn't worn like I see on some of these. The inlays are a bit prettier than some too (some of the abalone on these can be rather dark). All in all, very nice. It still has the dings on it, but that just means it has lived and been used rather than sitting in a case, under a bed, or in a closet. It still looks quite good despite the dings. I polished it with a fine compound to make it shine again.

It probably plays and sounds better than new - the pickups are a bit better balanced and won't feedback like the originals. But I didn't have originals, and I was not going to fork out a $100+ to get a set of them because these will perform match the hardware I had to also replace better as well. The strings align the pickup poles very well. I wound up using brass screws for the pickup rings and back plastic covers, so they may tarnish but they won't rust. The shiny gold hardware is a giveaway that it is all new. I have an open cover someplace for the pickup from an original bridge pickup, but I probably won't remove the gold cover and put the partial black cover on it - I have done that if I had an open zebra pickup before and it looks really good cosmetically (except I think the real magnaflux pickups were "reverse zebra" and nobody has square poles on one side except for these). This one is a restomod, made to look and feel stock but with some modern "aftermarket" parts (as good or maybe even slightly better than the original is the goal). No there isn't a 454 with fuel injection under the hood, but it keeps the stock vibe very nicely. So I am quite happy. Just need to crank it up a bit and test it some more. This one is one to play, and someone looking for 100% original would have to look for one stored under the bed or in the closet. But you can take this one and tour with it - and it should perform as well as just about any other. The satisfaction is making a cool guitar again out of a pile of parts. Something about me just can't stand to see one of these as a carcass when they are so cool guitars completed. I may wind up keeping it for me, since I have a moderate amount of money into it and even more time. It is probably worth more to me than to anyone else. It also is really quite loud acoustically too - surprisingly so even. So good guitar. Neck may be a little thinner profile - or it could be my imagination - didn't measure it.

_________________
Thorny


Top
 Profile  
 
 Post subject: Re: X310 restoration
PostPosted: Thu Nov 20, 2014 8:55 am 
Offline
User avatar

Joined: Mon Oct 27, 2008 7:10 pm
Posts: 3051
Location: Tifton, Ga USA
8) That ones a keeper

_________________
Always give thanks for everyday, It may be your last so Rock On Semper Fi!!


Top
 Profile  
 
 Post subject: Re: X310 restoration
PostPosted: Thu Nov 20, 2014 9:03 am 
Offline
User avatar

Joined: Fri Feb 11, 2011 1:19 pm
Posts: 714
Location: Harrisburg, Pennsylvania
Where'd you get the 5 way switch? Was it an original one from another Electra?

_________________
"GREAT Googiley moogilie Jack...jumpin jehosephat, hot dang and all".
- jdwhealton


Top
 Profile  
 
 Post subject: Re: X310 restoration
PostPosted: Thu Nov 20, 2014 9:35 am 
Offline
User avatar

Joined: Wed Nov 19, 2003 4:58 am
Posts: 984
Location: Southern Indiana
I found a new 5-way on ebay and took a chance. At the time I looked there wasn't an original one on ebay. I didn't want to wait, and I didn't want to pay an arm and a leg for a switch if I can find something that is just as good and available now (and a whole lot less expensive). This one was already going to have replacement parts in it. I gambled on this knowing that if I bought it and actually looked at it and it would not fit when I had it in my hands - I'd just have to eat the minimal costs or use it some place else (I build and work on amps too). The one I got would up having a D-shaft on it but the original knob has a locking allen screw, and it locks down fine and works perfectly (made no difference). I had an original knob, and an original 1-5 "poker chip" for the switch. I don't have correct looking replacements for those yet.

The body of the switch was slightly more compact, as were the tabs you solder too. We aren't talking any significant voltage or current here, so those aspects of the design do not matter. Also didn't have a "tooth" to dig into the wood from the back like the original (didn't know this until it arrived). It came with a nut and a washer. I bought and used a lock washer underneath it. I put down two pieces of double stick tape (3M spongy kind you hang up posters with) inside the hole after wiring, placed and positioned the switch, and tightened. Like I also said, the common points on the switch were not in the same position, so I had to adjust the wiring for that, but otherwise was the same. On the wiring, if the original was 1,2,3,4,5,0 (0 being the common lug), the new switch was 0,1,2,3,4,5 - so you had to move the wires for the pickups usually at "0" and adjust the position of the others one over. I hope this makes sense. This should be fine for a long time in there I hope. Seems to be well built. The nut is a little bit larger too. The only trick is you need to position it first. That sticky cushioned tape inside just keeps it in place so it does not slide (as does the lock washer to a lesser degree). I have had to resort to that tape or some foam that is sticky on the one side to mount the stock 5-way switches because if they are allowed to get loose, the "tooth" can scratch a circular channel on the inside and it can slip again. This way, it does not do that. I hope this makes sense to you all. I am visualizing this in my head right now.

You can search ebay and probalby find it. I will have to look in my history to see if I still have record of the part and if it is available. It might be good to have a few in hand again.

I found knobs that were the same general design, but wound up being larger. I know we should be able to find the correct style knobs at a good price from some place. That was a common design. I just can't find that size.

The poker chip - good luck with that. There is a place that makes a metal one. It looks better than nothing but does not look right. It would be easy to manufacture, but I would not have it done for just a couple - I'd have to buy a lot. And then I'd have to find someone to buy them. That would probably be too expensive. Now if I already made them, that would be another story. They are the same or almost the same as LP type, just with the 1-5 on them.

_________________
Thorny


Top
 Profile  
 
 Post subject: Re: X310 restoration
PostPosted: Thu Nov 20, 2014 10:56 am 
Offline
User avatar

Joined: Tue Dec 21, 2004 6:30 pm
Posts: 1763
Location: Central Iowa
was the 5 way different than the one I used for my outlaw resto I did a few years back. I think it's pictured in the wiring diagrams sticky...


edit: hmmm. it's not there. I'll have to dig it up....

_________________
My Electra Pages
I have too many projects!


Top
 Profile  
 
 Post subject: Re: X310 restoration
PostPosted: Thu Nov 20, 2014 11:58 am 
Offline
User avatar

Joined: Mon Jul 26, 2010 10:23 am
Posts: 1008
Location: Oxford, MI
mcbrat wrote:
was the 5 way different than the one I used for my outlaw resto I did a few years back. I think it's pictured in the wiring diagrams sticky...


edit: hmmm. it's not there. I'll have to dig it up....

Mick - You have the MPC and 5-Way switch wiring on your own website.

http://www.indysworld.com/guitars/Elect ... index.html

And there is a 5-Way switch diagram on the old Electra Page

http://www.rivercityamps.com/electra/slm3.php

_________________
"This is the way that pop ends, Not with a BANG but with a box set whose fourth disc you never get around to playing” - Simon Reynolds

"My guitar wants to kill your Mama" - Frank Zappa & The Mothers of Invention


Top
 Profile  
 
 Post subject: Re: X310 restoration
PostPosted: Thu Nov 20, 2014 12:38 pm 
Offline
User avatar

Joined: Fri Jun 08, 2007 2:06 am
Posts: 1085
Location: Mount Hunter, New South Wales, Australia
Love these stories; nice one, John!!

My own restos have come to a grinding halt because of lack of inclination presently; APII LC440 and Vantage Avenger AV310 both in bits and strewn about the workshop.... *sigh*

... hence liking this so much!! :up:

_________________
"... and on the eighth day, God created New Zealanders.

Because even the Australians need heroes."


Top
 Profile  
 
 Post subject: Re: X310 restoration
PostPosted: Thu Nov 20, 2014 1:37 pm 
Offline
User avatar

Joined: Tue Dec 21, 2004 6:30 pm
Posts: 1763
Location: Central Iowa
right, but I have a pic and diagram for the new 5-way that I used on the outlaw...


yyzrondo wrote:
mcbrat wrote:
was the 5 way different than the one I used for my outlaw resto I did a few years back. I think it's pictured in the wiring diagrams sticky...


edit: hmmm. it's not there. I'll have to dig it up....

Mick - You have the MPC and 5-Way switch wiring on your own website.

http://www.indysworld.com/guitars/Elect ... index.html

And there is a 5-Way switch diagram on the old Electra Page

http://www.rivercityamps.com/electra/slm3.php

_________________
My Electra Pages
I have too many projects!


Top
 Profile  
 
 Post subject: Re: X310 restoration
PostPosted: Thu Nov 20, 2014 8:03 pm 
Offline
User avatar

Joined: Tue Dec 21, 2004 6:30 pm
Posts: 1763
Location: Central Iowa
all the pics on my 720 rebuild were gone. I got them back now...

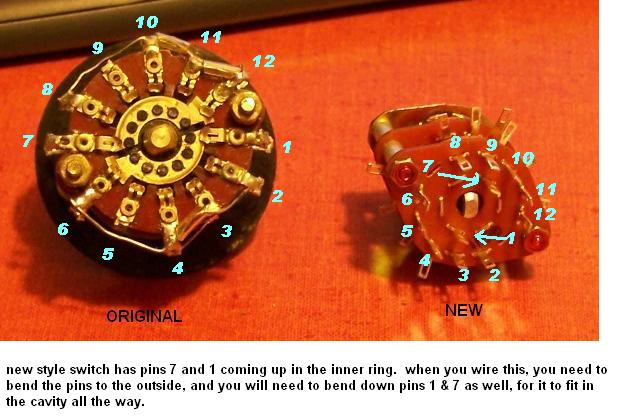
here's the switch I used... with notes... this image was missing from the sticky thread as well. it's now back there too....

Image

_________________
My Electra Pages
I have too many projects!


Top
 Profile  
 
 Post subject: Re: X310 restoration
PostPosted: Fri Nov 21, 2014 7:18 am 
Offline
User avatar

Joined: Wed Nov 19, 2003 4:58 am
Posts: 984
Location: Southern Indiana
The switch is different, laid out a bit more like the original but the switch body is ceramic instead of phenolic. This does not require bending of pins like your version and the orientation is similar to the original. However, the pins are not in the same order as the original as stated. And the size is more on the order of your smaller replacement. I actually bought it about a year ago (forgot it was that far back).

_________________
Thorny


Top
 Profile  
 
 Post subject: Re: X310 restoration
PostPosted: Sat Nov 22, 2014 9:21 am 
Offline

Joined: Fri Jul 11, 2008 4:11 pm
Posts: 692
Location: Tenn.
Great score and a great job on the resto. I agree on the pick ups, X310s werent super magnaflux pick ups and squeel uncontrollably if you take it out doors to play. Love it man, again great job. :up:

_________________
SlmGuy


Top
 Profile  
 
 Post subject: Re: X310 restoration
PostPosted: Mon Nov 24, 2014 7:24 am 
Offline
User avatar

Joined: Tue Dec 21, 2004 6:30 pm
Posts: 1763
Location: Central Iowa
Thorny wrote:
The switch is different, laid out a bit more like the original but the switch body is ceramic instead of phenolic. This does not require bending of pins like your version and the orientation is similar to the original. However, the pins are not in the same order as the original as stated. And the size is more on the order of your smaller replacement. I actually bought it about a year ago (forgot it was that far back).


didn't happen to get pics or make wiring diagram to add to the wiring sticky?

:)

_________________
My Electra Pages
I have too many projects!


Top
 Profile  
 
Display posts from previous:  Sort by  
Post new topic Reply to topic  [ 16 posts ]  Go to page 1, 2  Next

All times are UTC - 8 hours


Who is online

Users browsing this forum: No registered users and 12 guests


You cannot post new topics in this forum
You cannot reply to topics in this forum
You cannot edit your posts in this forum
You cannot delete your posts in this forum

Search for:
Jump to:  
Powered by phpBB® Forum Software © phpBB Group